Table of Contents
- Table of Contents
- Preface
- Writing a journal
- Adding a table of contents
- Apply your own domain to your tech blog
Preface
Firstly I would like to sincerely thank Mr. Xuan Huang (黄玄 | Huxpro) for providing this convenient Jekyll template. He actually supplies two templates for the general public to use:
What I am using for myself (Coding Bro 📒 代码笔记哥)is the boilerplate version.
Writing a journal
To write a journal for your blog, create a markdown file in _posts/ directory with format “yyyy-mm-dd-{your-journal-title}.md”, in which you can replace {your-journal-title} with any article name you want.
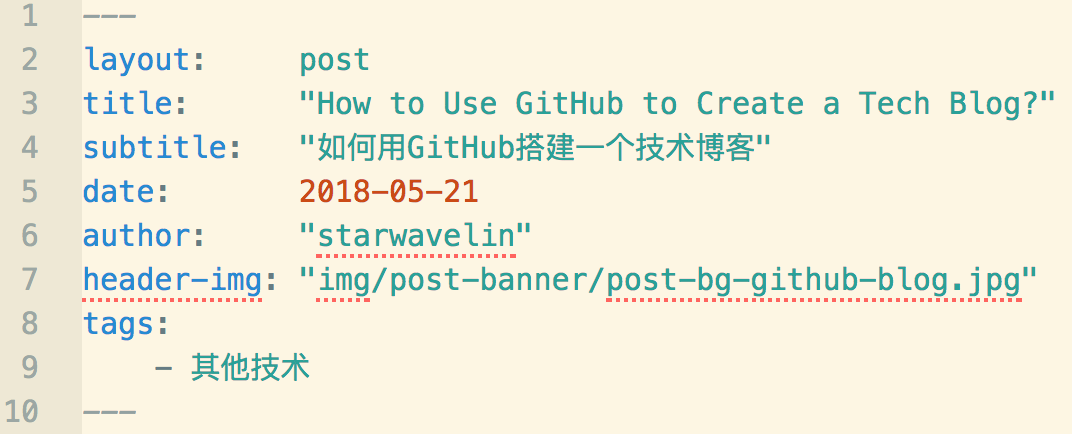
Then, within the .md file, the header should be coded in a somehow fixed format. Here I’d like to show you two screenshots and I guess after viewing them, you will know how to code your article.
 in this 10-line header code of a markdown file, just make sure the layout should be “post”, other fields can be customized or omitted
 corresponding outcome of the 10-line header code
And, Huxpro template also provides an automatically generated summary of an article you post.

Adding a table of contents
You can also add a table of content to your journal if you think necessary. To do so, you need a tool called gfm-toc
And I already wrote an instruction on how to use gfm-toc
 Hmm, seems like directly apply the gfm-toc tool above did not give what I want
No worries. I worked around to get it work. The error was actually because I set all the headers of each section in this journal to be h3 (header size 3, in markdown which is 3 hashes). Therefore, gfm-toc tool auto made 2 indentations to represent h3 header, like below.

Once I removed the redundant indentations to make the code as below

The problem resolved.
Apply your own domain to your tech blog
This step is optional and is not related to how to write an article. But isn’t that cool if you can set your own domain pointing to your own YOUR_USERNAME.github.io formatted tech blog?
Step 1: Purchase your domain (ie. I purchased starwavelin.com from godaddy)
Step 2: On your godaddy account’s DNS Management page, create A records that point your custom domain to the following IP addresses:
185.199.108.153
185.199.109.153
185.199.110.153
185.199.111.153
Step 3: In your GITHUB_USERNAME.github.io/ project directory, add a file named “CNAME”, and inside CNAME, just put one line – your domain name (ie. for me I put “starwavelin.com”)
Step 4: You can then update the url value of _config.yml from url: "https://GITHUB_USERNAME.github.io" into url: "https://YOUR_DOMAINNAME"